Sunday, February 12, 2012

Valentine sandwich cookies and a sweet purse

We made up a quick batch of sugar cookies last night, using Martha's sugar cookie recipe, which follows here. I eyeballed a quick frosting and tinted it pink for Valentine's Day. We, oh who are we kidding, I then wrapped them up and personalized them with some little stamps. Jack will be bringing some to friends at his preschool.


 Valentine Sandwich Cookies
  • 4 cups sifted all-purpose flour
  • 1/2 teaspoon salt
  • 1 teaspoon baking powder
  • 1 cup (2 sticks) unsalted butter
  • 2 cups sugar
  • 2 large eggs
  • 2 teaspoons pure vanilla extract, or 2 teaspoons fresh lemon juice and zest of 2 lemons
  • 1/4 cup fine sanding sugar, for decorating (optional)
  1. In a large bowl, sift together flour, salt, and baking powder. Set aside.
  2. Use an electric mixer to cream butter and sugar until fluffy. Beat in eggs.
  3. Add flour mixture, and mix on low speed until thoroughly combined. Stir in vanilla or lemon juice and zest. Wrap dough in plastic; chill for about 30 minutes.
  4. Preheat oven to 325 degrees. On a floured surface, roll dough to 1/8 inch thick. Cut into desired shapes. Transfer to ungreased baking sheets; refrigerate until firm, 15 minutes. Remove from refrigerator, and decorate with sanding sugar, if desired. Bake until edges just start to brown, 8 to 10 minutes. Cool on wire racks.      Yield Makes about 16 large cookies or 30 2 1/2-inch cookies

In other news, I recently realized that the makeup bag in my purse is waay too big and takes up too much space in my bag. Rather than go out and buy one, I figured I'd make a quick pattern and whip one up. From start to finish, this little purse took all of two hours to sew--and the ribbon is sewn on my hand. I love quick, rewarding little projects.


Here's what I did:
First, I cut out long rectangular pieces from two fabrics. I used my quilting ruler to help make sure they were square, especially the point at the one end for the closing flap.


Then I sewed the layers together, right sides together, leaving the short, straight end open. I snipped the corners, then turned it out carefully.
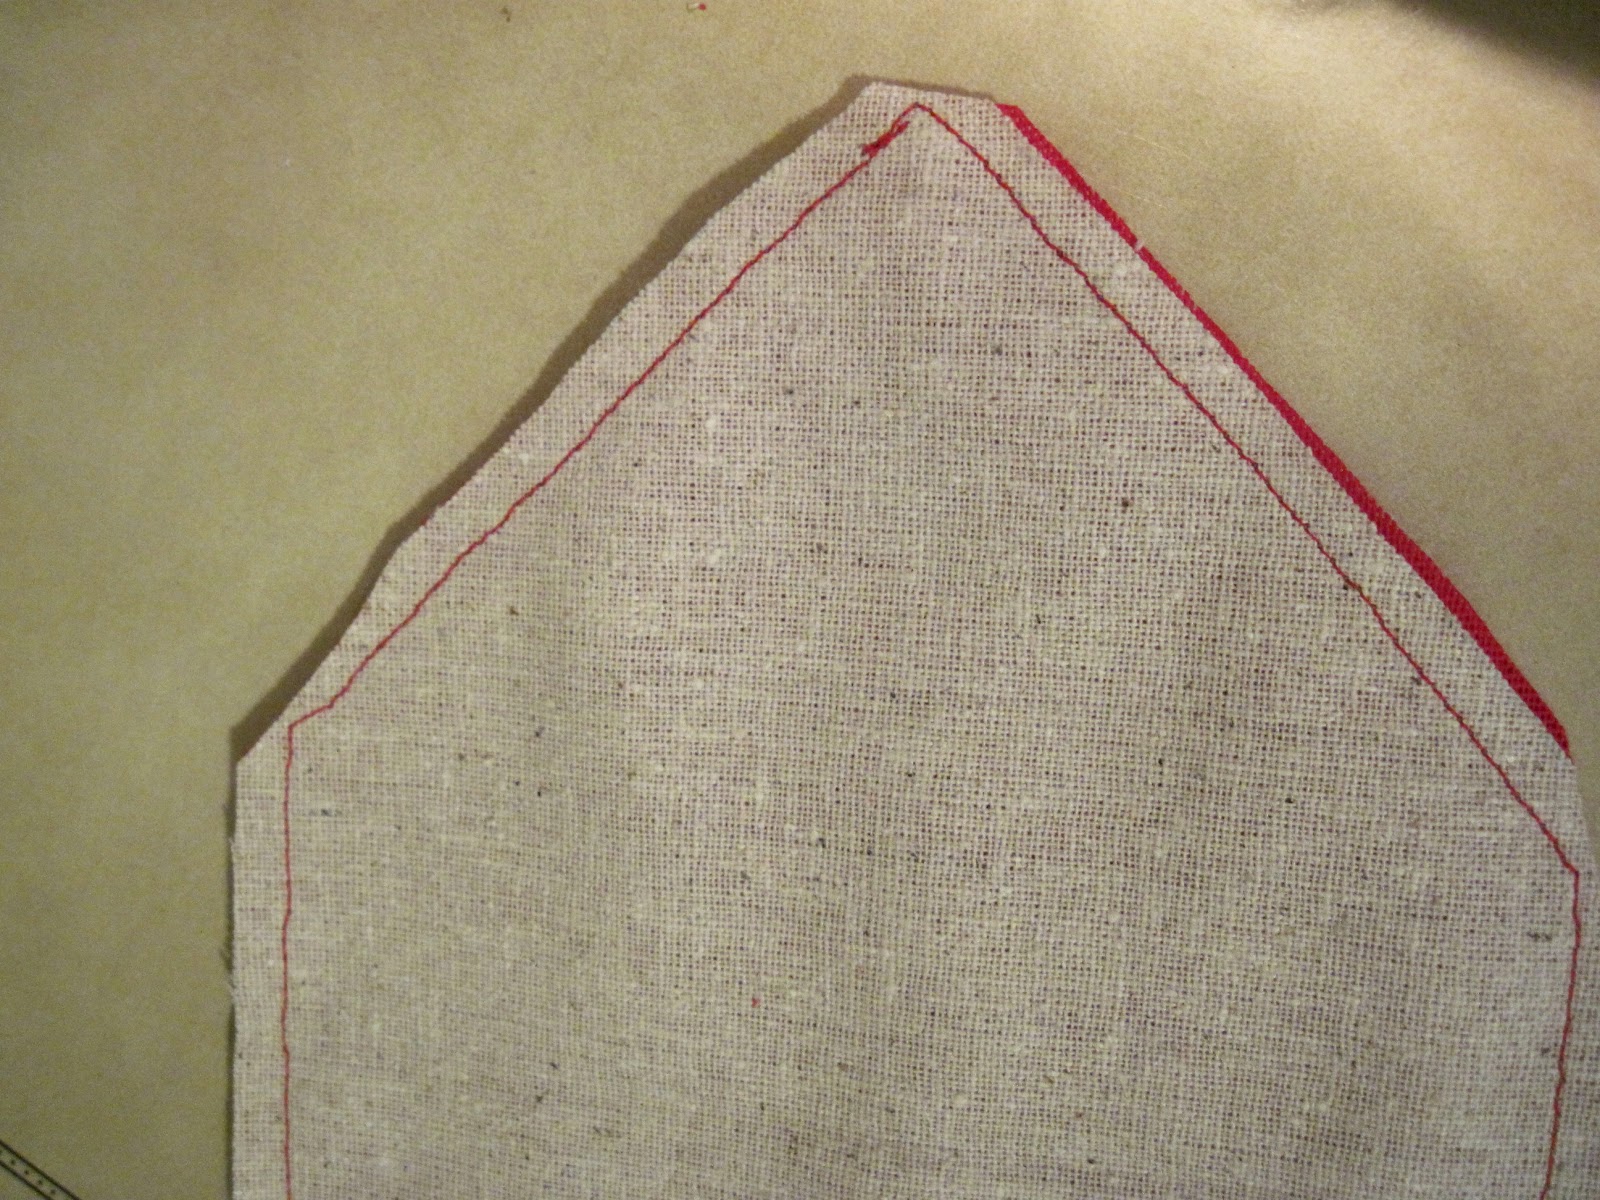
Then I turned the open end in neatly and sewed that closed, sewing all around the perimeter of the piece, with about a quarter inch seam.
Then I folded it in threes, with the lining fabric on the inside. Mine is tan muslin. I also place the ribbon down, wrapping the ends in at one side.

 Then I ran it through my sewing machine and used short, strong stitches up the two sides.
Next, I pinned the ribbon around the base where I wanted it. (The ends were already sewn in when I stitched up the sides.) Then I hand sewed it on with dark blue thread.

And voila! Done.

Saturday, February 4, 2012

Whale watching and rugelach

We spent the weekend looking for whales out at Bodega Bay. We saw a few sprays, but no actual whale was spotted. The weather was clear and sunny and cool--Jack ran around in the fields while my girlfriend, Bri, and I ate scones and jam.


And a few projects were finished when someone got a cold (Jack) and someone else (me) got to stay home from work and keep him company.
First: an aquarium scene made out of construction paper and sequins.

Second: some seriously delicious rugelach.

You can find the recipe in my favorite baking cookbook: Martha's Baking Handbook or online here. These are so friggin' good, I have a tummy ache from eating waaay too many. The flaky layers are almost pastry-like and hold chocolate slivers, finely-chopped walnuts, raisins and sticky apricot jam. The filling in my book is different from the one online, I used 1 cup of walnuts, 1/4 cup of sugar and only 3/4 cup of jam. I made half of ours with chocolate, the other with raisins, all with nuts. Too good.

And from what I remember from my coffee shop days, rugelach freeze really well once baked. (I've already put more than half in the freezer to deter a late night rugelach attack.)


And I found this in a drawer the other day, don't you just love these? Jack is fascinated by it, and always wants to drink the water out of it. Yuck.

Thursday, January 19, 2012

Sweater quilt

I've been wanting to make this quilt for a long time. I think I saw one here a while back and loved it. As each one of my favorite sweaters begins to show its' age or gets too tight or just not right for me anymore, there's been a crafty voice in my head that whispers "sweater quilt, sweater quilt."

So over this incredibly lengthy and relaxing Winter break, I finally began The Sweater Quilt.

First, I gathered up seven sweaters that were all sizes medium or large and about the same, medium weight. I then grabbed by rotary cutter and self-healing mat and cut them into six by twelve-inch strips.

I arranged the strips on my queen-sized bed in a way that was pleasing to my eye.

Then I stacked each vertical row together, stacking them one on top of the other, so I'd know which way to sew the strips together in the pattern I wanted.


Then I sewed the strips together, stacking them and running them through my machine on a straight stitch with medium length. I ended up with 11 long vertical strips with about seven and a half 6x12-inch strips. I say one half because I didn't want any long horizontal seams. In other words, I didn't want my blocks to line up, so I added a piece that was 3 or 6 x12 at some spot on every vertical strip to give each strip a unique pattern. (See the picture with all the strips laid out--they don't line up horizontally.)

After sewing the strips I squared them up, making sure that they consistently measured six inches all the way down.

And that's as far as I've gotten. Next, I'll stitch all the long strips together. I'm excited to see all my sweaters together, in one big cozy blanket.

Saturday, December 17, 2011

Handmade sleep mask

I made this Paris-inspired sleep mask for my sister last week. The cream-colored lining and lace were 'borrowed' from an old nightgown of mine and the blue silky fabric (seen on the front here) used to be inside a wool skirt! I love re-purposing and using things on hand. I searched for about an hour for these materials, through fabric scraps and old clothes waiting to be donated...it was delightful to find such pretty fabrics and fixings in what I already own.

Here's how I made it:
First, I used my (homemade) sleep mask as a template. It would be easy to sketch one if you don't already have a sleep mask, I'd just draw one big enough to comfortably cover the owner's eyes and then some.
Then I traced that onto the wrong side of my two fabrics. I like a soft, silky lining for the inside (the fabric that will be against the eyes.) I cut the two pieces about 1/2 inch larger all around and used my iron to press it along the traced line.
Then I cut out a double piece of cotton flannel about 1/4 inch smaller than the pressed pieces to sandwich between the two fancy fabrics. I pinned this 'sandwich' together, adding the elastic at the sides.


And then I put on some DVR'd 30 Rocks and sat down and hand-sewed all around the perimeter, making tiny stitches, and adding extra stitches around the elastic for strength. I think my sister could choose to wear it with either side facing out.

Monday, December 12, 2011

Gift box from a cereal box


If you're like me, then you probably have about four empty cereal boxes filling your kitchen recycling bin. If you're also like me, then you also have a serious shortage of cute boxes to give away your Christmas presents this year. I love the idea of using something that you'd normally recycle in lieu of buying something that would also just be recycled. While it takes a few steps (and a glue gun) I think this project is super cool and really useful. Find directions here.

Sunday, December 4, 2011

Handmade Christmas update

I whipped up these potholders last night from some already quilted fabric I bought. I've found that potholders need a good, grippy material on at least one side to really hold the pot safely. I made some out of 100% cotton once and they were just a little too slippery. These ones have canvas on the other side. I used extra wide double-fold bias tape along the edges and stitched in the ditch (along the already quilted seams) to make these potholders look more quilted. Get ready, Dad!

And I still have a few of these precious strawberry pincushions left from the spot I once held in a gift shop. They make great stocking stuffers for sewers. Directions here.

I realize after seeing this photo that I really should have taken the time to iron the bag before photographing it.  I made this out of a canvas bag from Joann's. It's a great big bag made of medium-weight canvas that I got on sale for, like, crazy cheap. I added the fabric design using Steam-a-Seam, my favorite, and added a cute little pocket on the back out of the same material. Slowly but surely, the gifts are coming together!

Saturday, December 3, 2011

Thanksgiving round-up

We made this cute homemade turkey centerpiece with a few pieces of construction paper, a big pine cone, some white glue and a few beads. I just glued the leaves onto the pieces of the pine cone.

And these pumpkin pancakes are seriously the best I've found, and I love pancakes.  I also really love pumpkin, people, so I'm picky. These suckers are a great way to use up any of that leftover pumpkin you may still have in your fridge from that pie... They are creamy and dense with a great spice flavor, but don't be afraid to add more spice. Find the recipe here.

Tuesday, November 22, 2011

Handmade Christmas: Part Deux


I had myself a little candle-making party today. I'm sorry, but the best thing about working in education is these long breaks. A week off for Thanksgiving? Yes, please.

So in my quest for great handmade gifts, I'd remembered seeing these on Martha's website. I had a huge (I mean silly big) candle and this cute set of teacups, and all I really needed were the wicks. These took longer to find, but I finally found them at Michael's.

I did make a huge mess at one point (melted wax all over the table) but these were totally worth it. I think they make cute gifts and when the candles are spent, the recipient can just put the teacups in the freezer and the remaining wax will just pop out. Voila! New cup. Martha's are quite cute. Directions here.

Monday, November 21, 2011

Pumpkin pudding

Found myself craving pumpkin pie yesterday and was feeling absolutely unwilling to wait until Thanksgiving to get some. I'd seen this recipe over at Smitten Kitchen a few days earlier and was considering making some of these when I ended up talking to my sister who told me she'd just made them.

Luckily, she told me to amp up the flavor a bit. I added additional salt, sugar and spices and followed the recipe for cooking the pumpkin on the stove top first, although I didn't put it in the food processor like the recipe suggests.

 
Anyway, they are crazy good. They're like pumpkin pie without the crust. I made them in a cupcake pan, with liners and just eat them from the cups. And while we didn't have any gingersnaps to eat them with (also as suggested) I found that the graham crackers we always have on hand do the job just fine.

Sunday, November 13, 2011

More handmade gifts

Embellished tote bags for my gals who like to tote things. For directions, go here

Healthy breakfast recipe


Preheat oven to 180C, 350F
Cream together 2oz butter with 4oz runny honey.  Gradually mix in a beaten egg.  Add 4oz of grated apple and 2 small mashed bananas and 3oz of self-raising flour. Finish off with 2oz of any dried fruit (or in a less healthy version chocolate chips!) and 1 tsp of grated lemon or orange zest.
If the mix is very sloppy, add more flour until a spoon will stand upright in it and bake in a shallow, lined tin until browned (approx 40 mins).
Cool and cut into fingers to serve, it will last 4 days in an airtight tin if it isn't eaten in one sitting!

Homemade Christmas gifts

This year, I and (some of) my family have decided to go all handmade on the gift-giving. I'm excited because it's always something I've wanted to do. And with the Occupy protests going on around here, it's a natural choice to forgo the frenzied dash to buy and rather, make.

I have so many ideas: homemade sugar scrubs, potholders, children's smocks, bags, aprons, blankets....and on. I've decided to organize my projects here on the blog, and gather cool ideas for future works.


For Jack, I'm making a boy version of this smock:


And I was thinking a pillowcase:

Source: Mousy Brown

And that's all I've got so far. In other news, Jack and I made an autumn mobile from things we gathered at the park.


And I made another one of my grandma's recipes, these Cranberry Almond cookies


The cookies were delicious when they first came out of the oven, but they softened up quite a bit over the last day; maybe it's the fresh cranberries. I've been storing them in plastic, perhaps waxed paper would keep them more crisp. Very balanced flavor though and the almonds and cranberries are great together. 

I'm cooking my way through my grandmother's recipes, I inherited them when she died a few months ago. It's such a personal experience, holding these cards that she wrote in my hands.

Hope everyone is enjoying this beautiful fall...

Sunday, November 6, 2011

Macaroons


The first time I ever had a macaroon was in Beauvais airport outside Paris as I was about to leave France for what I thought would be quite a long time. On my way out of Paris, I stopped by this little patisserie on the corner close to my hostel to pick up some treats for the plane ride back to Ireland. I think I'd stopped at the same patisserie at least every day of my short visit, probably to pick up an almond croissant or a baguette or something I couldn't pronounce (example: mille fuille). 

Anyway, back at the airport I hastily pulled out the chocolate macaroons. As I bit into one, I fell head over heels. The chewy, fudgy texture was somehow delicate, the chocolate was sophisticated and cocoa-y. I somehow managed to save the other macaroon (yes, I knew to buy two!) for my sister who was back in our apartment in Dublin. A fellow pastry and chocolate enthusiast, she too swooned over the petite delicacy.

Fast forward five years. My sister and I are back in the states, living an hour apart. I just happen to buy some almond meal at the store one day, my subconscious sweet tooth hinting at macaroons in my future. And lo and behold, my sister and I happen to have an afternoon together--one that would be perfect for making macaroons.

We found the recipe in Martha's Baking Handbook, my new favorite cookbook. The recipe for the cookies was spot on, but I would definitely swap out a different frosting. Her recipe calls for Swiss meringue buttercream which I found to taste almost like whipped cream. The macaroons I had in Paris were sandwiched with a dense, silky, almost chewy filling. Find the recipe here.

Oh, and the chestnuts I roasted were not good. I don't know what happened, but they tasted rancid. Gross.