Saturday, December 17, 2011

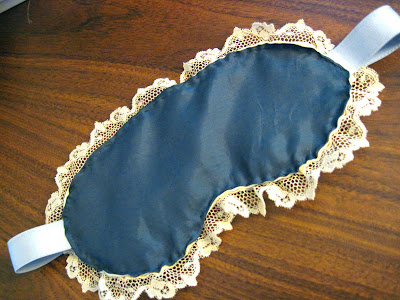
Handmade sleep mask

I made this Paris-inspired sleep mask for my sister last week. The cream-colored lining and lace were 'borrowed' from an old nightgown of mine and the blue silky fabric (seen on the front here) used to be inside a wool skirt! I love re-purposing and using things on hand. I searched for about an hour for these materials, through fabric scraps and old clothes waiting to be donated...it was delightful to find such pretty fabrics and fixings in what I already own.

Here's how I made it:
First, I used my (homemade) sleep mask as a template. It would be easy to sketch one if you don't already have a sleep mask, I'd just draw one big enough to comfortably cover the owner's eyes and then some.
Then I traced that onto the wrong side of my two fabrics. I like a soft, silky lining for the inside (the fabric that will be against the eyes.) I cut the two pieces about 1/2 inch larger all around and used my iron to press it along the traced line.
Then I cut out a double piece of cotton flannel about 1/4 inch smaller than the pressed pieces to sandwich between the two fancy fabrics. I pinned this 'sandwich' together, adding the elastic at the sides.


And then I put on some DVR'd 30 Rocks and sat down and hand-sewed all around the perimeter, making tiny stitches, and adding extra stitches around the elastic for strength. I think my sister could choose to wear it with either side facing out.
Monday, December 12, 2011

Gift box from a cereal box


If you're like me, then you probably have about four empty cereal boxes filling your kitchen recycling bin. If you're also like me, then you also have a serious shortage of cute boxes to give away your Christmas presents this year. I love the idea of using something that you'd normally recycle in lieu of buying something that would also just be recycled. While it takes a few steps (and a glue gun) I think this project is super cool and really useful. Find directions here.

Sunday, December 4, 2011

Handmade Christmas update

I whipped up these potholders last night from some already quilted fabric I bought. I've found that potholders need a good, grippy material on at least one side to really hold the pot safely. I made some out of 100% cotton once and they were just a little too slippery. These ones have canvas on the other side. I used extra wide double-fold bias tape along the edges and stitched in the ditch (along the already quilted seams) to make these potholders look more quilted. Get ready, Dad!

And I still have a few of these precious strawberry pincushions left from the spot I once held in a gift shop. They make great stocking stuffers for sewers. Directions here.

I realize after seeing this photo that I really should have taken the time to iron the bag before photographing it.  I made this out of a canvas bag from Joann's. It's a great big bag made of medium-weight canvas that I got on sale for, like, crazy cheap. I added the fabric design using Steam-a-Seam, my favorite, and added a cute little pocket on the back out of the same material. Slowly but surely, the gifts are coming together!

Saturday, December 3, 2011

Thanksgiving round-up

We made this cute homemade turkey centerpiece with a few pieces of construction paper, a big pine cone, some white glue and a few beads. I just glued the leaves onto the pieces of the pine cone.

And these pumpkin pancakes are seriously the best I've found, and I love pancakes.  I also really love pumpkin, people, so I'm picky. These suckers are a great way to use up any of that leftover pumpkin you may still have in your fridge from that pie... They are creamy and dense with a great spice flavor, but don't be afraid to add more spice. Find the recipe here.

Tuesday, November 22, 2011

Handmade Christmas: Part Deux


I had myself a little candle-making party today. I'm sorry, but the best thing about working in education is these long breaks. A week off for Thanksgiving? Yes, please.

So in my quest for great handmade gifts, I'd remembered seeing these on Martha's website. I had a huge (I mean silly big) candle and this cute set of teacups, and all I really needed were the wicks. These took longer to find, but I finally found them at Michael's.

I did make a huge mess at one point (melted wax all over the table) but these were totally worth it. I think they make cute gifts and when the candles are spent, the recipient can just put the teacups in the freezer and the remaining wax will just pop out. Voila! New cup. Martha's are quite cute. Directions here.

Monday, November 21, 2011

Pumpkin pudding

Found myself craving pumpkin pie yesterday and was feeling absolutely unwilling to wait until Thanksgiving to get some. I'd seen this recipe over at Smitten Kitchen a few days earlier and was considering making some of these when I ended up talking to my sister who told me she'd just made them.

Luckily, she told me to amp up the flavor a bit. I added additional salt, sugar and spices and followed the recipe for cooking the pumpkin on the stove top first, although I didn't put it in the food processor like the recipe suggests.

 
Anyway, they are crazy good. They're like pumpkin pie without the crust. I made them in a cupcake pan, with liners and just eat them from the cups. And while we didn't have any gingersnaps to eat them with (also as suggested) I found that the graham crackers we always have on hand do the job just fine.

Sunday, November 13, 2011

More handmade gifts

Embellished tote bags for my gals who like to tote things. For directions, go here

Healthy breakfast recipe


Preheat oven to 180C, 350F
Cream together 2oz butter with 4oz runny honey.  Gradually mix in a beaten egg.  Add 4oz of grated apple and 2 small mashed bananas and 3oz of self-raising flour. Finish off with 2oz of any dried fruit (or in a less healthy version chocolate chips!) and 1 tsp of grated lemon or orange zest.
If the mix is very sloppy, add more flour until a spoon will stand upright in it and bake in a shallow, lined tin until browned (approx 40 mins).
Cool and cut into fingers to serve, it will last 4 days in an airtight tin if it isn't eaten in one sitting!

Homemade Christmas gifts

This year, I and (some of) my family have decided to go all handmade on the gift-giving. I'm excited because it's always something I've wanted to do. And with the Occupy protests going on around here, it's a natural choice to forgo the frenzied dash to buy and rather, make.

I have so many ideas: homemade sugar scrubs, potholders, children's smocks, bags, aprons, blankets....and on. I've decided to organize my projects here on the blog, and gather cool ideas for future works.


For Jack, I'm making a boy version of this smock:


And I was thinking a pillowcase:

Source: Mousy Brown

And that's all I've got so far. In other news, Jack and I made an autumn mobile from things we gathered at the park.


And I made another one of my grandma's recipes, these Cranberry Almond cookies


The cookies were delicious when they first came out of the oven, but they softened up quite a bit over the last day; maybe it's the fresh cranberries. I've been storing them in plastic, perhaps waxed paper would keep them more crisp. Very balanced flavor though and the almonds and cranberries are great together. 

I'm cooking my way through my grandmother's recipes, I inherited them when she died a few months ago. It's such a personal experience, holding these cards that she wrote in my hands.

Hope everyone is enjoying this beautiful fall...

Sunday, November 6, 2011

Macaroons


The first time I ever had a macaroon was in Beauvais airport outside Paris as I was about to leave France for what I thought would be quite a long time. On my way out of Paris, I stopped by this little patisserie on the corner close to my hostel to pick up some treats for the plane ride back to Ireland. I think I'd stopped at the same patisserie at least every day of my short visit, probably to pick up an almond croissant or a baguette or something I couldn't pronounce (example: mille fuille). 

Anyway, back at the airport I hastily pulled out the chocolate macaroons. As I bit into one, I fell head over heels. The chewy, fudgy texture was somehow delicate, the chocolate was sophisticated and cocoa-y. I somehow managed to save the other macaroon (yes, I knew to buy two!) for my sister who was back in our apartment in Dublin. A fellow pastry and chocolate enthusiast, she too swooned over the petite delicacy.

Fast forward five years. My sister and I are back in the states, living an hour apart. I just happen to buy some almond meal at the store one day, my subconscious sweet tooth hinting at macaroons in my future. And lo and behold, my sister and I happen to have an afternoon together--one that would be perfect for making macaroons.

We found the recipe in Martha's Baking Handbook, my new favorite cookbook. The recipe for the cookies was spot on, but I would definitely swap out a different frosting. Her recipe calls for Swiss meringue buttercream which I found to taste almost like whipped cream. The macaroons I had in Paris were sandwiched with a dense, silky, almost chewy filling. Find the recipe here.

Oh, and the chestnuts I roasted were not good. I don't know what happened, but they tasted rancid. Gross.

Sunday, October 23, 2011

Roasted chestnuts

Jack and I like to visit a particular park here in Santa Rosa around this time of year because it has three glorious chestnut trees that drop these little babies. We spend time looking for good, shiny nuts beneath the trees and maybe even pick some from the trees and husk them for our collection.


Well, yesterday we weren't alone in our chestnut gathering. A man showed up all prepared with a plastic bag to collect some too. Luckily, there were more than enough to go around. Now, onto roasting.


I've never actually roasted my own chestnuts before. The first time I ever had them was while walking the streets of Rome in winter, where they are sold in the infamous paper cones. People just drop the shells in the street. I remember wondering how all the Italian women, in their amazing high-heeled boots didn't trip on them. How do European women navigate those cobblestone streets in heels?
I've seen chestnuts roasted in a coffee roaster...those were good, but the ones in those street 'ovens' seem to do the best job.
I've found lots of simple directions for roasting these babies in the oven. I've excerpted some directions from a Smitten Kitchen recipe below.


Preheat oven to 450°F. Cut a small X on the top of each chestnut with a very sharp knife. Don’t be afraid to cut into the “meat” of the chestnut a little; I found that the the ones that were the most easy to peel start with a deep enough cut that the skin peels back while roasting. Roast chestnuts on a baking sheet for about 20 to 30 minutes, until a darker shade of brown and the X peels back to reveal the inner nut.
Cool on tray and then peel.
 I'll let you know how they turn out...

Sunday, October 9, 2011

More cute handmade costumes!

I know, I must stop! But there are so many cute ideas!

Directions here

Directions here

My son would love to be a car! Directions here

Quinoa burgers

These will definitely be on the menu the next time my sister rolls into town. They love quinoa over there in San Francisco. I have never prepared quinoa before (I know, how is this possible?) and feel that the time has come to try it once and for all. I've been eyeing some recipes for quinoa breakfast porridge and 'risotto.'

I found the recipe here, it follows below.

Quinoa burgers
1 cup uncooked quinoa
2 cups water
1/2 teaspoon salt
To cook quinoa:
In a medium saucepan bring the 2 cups water and 1/2 teaspoon salt to a boil over high heat.  Add quinoa and reduce heat to low.  Cover and cook for 18-20 minutes, or until all water is absorbed and the seeds are tender.  Allow to cool for a few minutes.
OR  2 rounded cups leftover, cooked quinoa
.
3/4 cup shredded cheddar cheese (or other variety, if you prefer)
1/2 cup low-fat cottage cheese
1 medium carrot, finely grated (OR 1 cup shredded zucchini, squeezed)
3 eggs
3 tablespoons all purpose flour
2 green onions, including white parts
1 /2 teaspoon Splenda or sugar
1/4 teaspoon black pepper
1/4 teaspoon ground cumin
1/8 teaspoon salt
1/8 teaspoon garlic powder
Olive oil for frying
.
In a large bowl combine the cooked quinoa, cheddar cheese, cottage cheese, carrot, eggs, flour, green onions, Splenda, pepper, cumin, salt, and garlic powder.
Heat a frying pan and a couple teaspoons olive oil over medium-low heat.  Measure 1/4 cup and form into patties about 1/2 inch thick  - mixture will be slightly sticky.  Fry until golden-brown, about 4 minutes on each side.   Makes approx. 10 burgers.
Per burger:  Calories 132; Protein 8 g; Fat 5 g; NET Carbs 12 g; (Fiber 2 g); Sugar 0 g; Sodium 200 mg

Saturday, October 8, 2011

Cute handmade adult mini-costumes

These are so darned cute and look so fun to make. Since I became a mom, I haven't wanted to 'really'
 dress up for Halloween, it makes sense for Jack to take center stage now, at least for a few years. The little 'hat-ettes' would be perfect and look so fun to make! For directions, click here

But last year, I made this and wore it while Trick-or-Treating around with Jack.

Nails!

source

Homemade Halloween costumes

I really enjoy making beautiful costumes to dress my son in at Halloween. I found some great ideas online for this years' creation.

Source: here

Another sweatsuit costume idea
You can buy this sew-your-own dinosaur here on Etsy.

I love this one!

Find directions for the gnome here.

Next, the Superhero!

Directions here

This wouldn't be that complicated, if you could just find a fuzzy sweater/onesie like that to start with.

The owl costume can be purchased here

Thursday, September 22, 2011

Carrot Cake

This is my attempt at copying the cake below:

I didn't finish the edges in the same way, but I think it was still pretty. And I used Ina's recipe for Carrot and Pineapple Cake and it was seriously the best carrot cake ever. Super moist and dense. The only thing I'd change is that I'd use salted butter in the frosting, I think it needed another element. I don't like frostings that just taste sweet, you know? 

A Birthday smock


A little friend of ours was having her 2nd birthday, so I whipped up this quick smock using a pattern from Amy Karol's Bend-the Rules Sewing. I wanted to do a trial run of the pattern before making one for Christmas this year for my little man. Our friend is a very girly girl, so I chose this blue fabric with little blue roses and a wide red bias tape for the edges. It's made from one piece of fabric, but took me a surprisingly long time to make (I don't know why, but Lord knows I'm not the fastest sewer.)

I thought it came out really well, and it was rather a hit at the party (if I may say so myself.) I'm hoping to find a cool fabric for Jack's, maybe with dinosaurs on it. His smock will most likely be more of an apron, since we'll probably use it primarily for baking and making pancakes on weekends. The size given in the book (with the pattern enlarged to the suggested 235%) is about a 2T-3T and would comfortably fit most of the 2-3-year-olds that we know.

In other news, we were lucky enough to spend a morning the other day watching a family of deer eat pears beneath the tree in our front yard. Our bedroom window looks out onto the tree, so we could safely watch them without freaking them out. I gotta say, deer sure drool a lot more than I'd thought.