Sunday, December 9, 2012

Handmade baby shower gifts


One of my friends is expecting her first child. When considering what to give her, I thought of the item I used everyday with my baby that, before kids, I'd never even known existed and had no idea I would need so much. This, of course, is a nursing cover.

So I made this cover, boning and all, out of a pretty fabric I found at Joann's. It's a bit complicated to put together (it was my first time using boning) but this tutorial is excellent.

To round out the gift, I made this little soft rattle filled with jingle bells for the baby. I remember my little one loving rattles, but he'd inevitably drop them on his head--and crying would ensue. So I thought soft rattles=fun with no tears! I used the directions here to put it together.


Sunday, December 2, 2012

Cake pops

We made these for our little man's preschool buddies last week. It was my first attempt at making cake pops and they came out great. I would recommend watching this short and helpful tutorial before making your own, because it seems like there are some things that could go wrong and you really want these to turn out right, because when they are right, they are so right, it's scary. The cake inside is moist and decadent (because it's mixed with frosting) and it combines so well with the semi-hard chocolate outside...it's just awesome.

I used a boxed spice cake mix, homemade cream cheese frosting and two bags of white chocolate chips. These buggers use up a lot of chocolate coating, more than I thought. The first step is to crumble the cake up into tiny pieces. You'll need a huge bowl or you'll just have to do it in two batches, like I did.


The next step is to add frosting, but as the tutorial and many recipes warn, do not add too much or you will get gooey, overly sweet cake. I used a big spoonful, maybe about two or three tablespoons, for half of a 9 x 13-inch cake. You want to be able to roll the cake into balls, but you don't want them sticky.


Next, you dip one end of your skewers or lollipop sticks into a little bit of the chocolate that you are going to use to coat them later and press these halfway into the balls. This step is meant to ensure that the balls won't fall off the sticks.

The cake balls can be as big as you want them, I made mine kinda large and they were a little hard to eat off the stick, that is, the weight kinda pulled them off after the first bite. Plus, they are pretty rich, so keep this in mind when you are rolling them. One box of cake made about 2 dozen cake pops.

After the sticks are in, throw the cake pops in the freezer for at least 20 minutes. I left mine in for a few days (after transferring them to freezer bags for freshness.)

When you're ready to dip and decorate, first make sure you have something that you can use to prop up your pops while the chocolate hardens. Styrofoam or floral foam works well, but I didn't have either of these lying around, so I poked some holes in a cardboard box lid and voila--it worked perfectly.

Next, you just melt your chocolate and dip those little suckers in there. Let the excess chocolate drip off so it doesn't run down the stick when you turn it right side up. Sprinkle with little candies, or don't, they look great either way. Let the chocolate harden (which doesn't take long since the pops are frozen.) Let them sit for a bit so the cake cools to room temperature and then enjoy. I kept them at room temp for a few days and they were awesome!

Sunday, November 25, 2012

Farmer's Market adventures

Since we found out that we'd be having another child, I've been trying to create daily or weekly rituals for Jack and me. One of these is our weekly visit to the farmer's market. We're so lucky to live in California, in the wine country no less, because we get beautiful seasonal produce all year. Our farmer's market is popular in the community, so going there is a great opportunity for us to people watch and be reminded of the kind of community we live in. There's always live music and picnic tables set up, even a little playground for Jack to play on.


We have one rule (that sometimes sticks, other times...not so much.) We have to get one healthy thing each, and then one sweet or unhealthy thing to share. Most times we get apples to munch on while we search for a huge muffin (like the chocolate cherry one above) but other times Jack surprises me and gets a pomegranate or a persimmon. Once he actually chose a basket of organic strawberries as his 'sweet treat.'

I'm hoping we can keep up this weekly tradition after the baby comes, it's such a positive way to learn about where our food comes from and a simple activity to celebrate the changing seasons...

Sunday, October 21, 2012

What may be the best cookies ever?

Holy crap. I just saw this recipe and had to post a link to it, if only so I don't forget that these exist.


Who wants some Nutella-stuffed Brown Butter and Sea Salt Chocolate Chip Cookies? Recipe here

Wednesday, October 17, 2012

Handmade Halloween costumes

Here are a few ideas for cute homemade Halloween costumes I found over at Martha.


I think this last one would be great for a very-pregnant lady like myself, I was thinking of expanding on it and going as a black widow. Hmmm....

Pretty things


I love this decorating idea, the natural wood shelves and rock vases...so inspiring.


Saturday, October 6, 2012

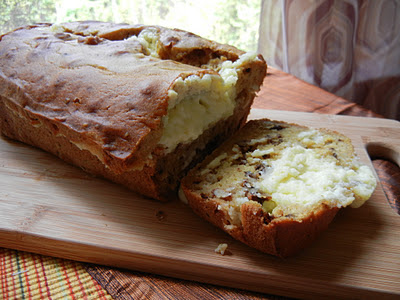
Pumpkin bread with cream cheese filling and homemade vanilla extract


Seriously, this looks so good I think I'm going to make it for dinner tonight.  Find the recipe here

I also made some homemade vanilla extract a few weeks back. I found the recipe in this awesome book that I got for Christmas last year.


The homemade vanilla is relatively simple to make, and pretty inexpensive when you consider how much a tiny jar of extract costs. This recipe makes a ton (about two cups worth) and uses just five vanilla beans (about $3 at Whole Foods) and two cups of vodka (the cost depends on the quality of vodka you use, I had Smirnoff on hand.)

To make it, you just gather a mason jar (mine held 16 oz. filled up to the very top,) some vanilla beans (5) and rum or vodka. Open and scrape the vanilla pods, stuff the seeds and the pods into the jar and fill it up with your alcohol.


Then let it sit for a few months before using, shaking every week or so. Mine should be ready around Thanksgiving, before I begin all my holiday baking. And I seriously go through a lot of vanilla, more so than liquor (especially now that I'm pregnant!) The flavor of the homemade variety is supposed to be much better. This is what mine looked like after I made it, but it's already much darker now after just a few weeks.


Sunday, September 30, 2012

Pear bread and Liberace pumpkins, ahh...Fall is here

We have a lovely pear tree in our front yard that dumps pears every year from August to October. We let the deer eat lots of them, we share them with friends and eat plenty on our own, but I wanted to find a good recipe for baking with them. I made pear pie last year, which was yummy, and have tried out different crumble recipes, but this pear bread was really tasty. It's similar to zucchini bread, but with a somewhat more grainy, pear-like texture. Very moist and flavorful, great for breakfast and afternoon tea.
Recipe here.

In other news, aren't these the cutest/most gaudy Halloween decorations? I'm making one...or five. Directions here.


Sunday, September 23, 2012

Trip to Ireland

Sorry about the radio silence, but we've been on a lovely, long trip in Ireland. My husband is from Northern Ireland and this trip has been long in the works.


It was great for him to get back home and wonderful to introduce our little one to all things Irish. I was thrilled to get back to the country that feels like my second home. I mean, look at how beautiful and green it is...


Here is a short video of Grafton Street in Dublin. It rained on this day (and on the other 16 of the 17 days we were there--hello Irish summer!)


 So the trip plus the fact that I am now six months pregnant (!) combine to make one pretty good excuse for not blogging for the last three months if I do say so myself! I hope to do more now that we are in fall again (ahhhh) and I'm itching to get baking and crafting.

Wednesday, June 13, 2012

Moosewood Brownies


I think I've found my brownie recipe. I baked off a tray of these decadent, fudgy brownies for a pool party recently. The pool party ended up getting canceled...and guess what happened to all the brownies?

No, I didn't eat all of them. I froze half (they freeze beautifully--are even more moist once thawed) and shared them with lucky friends who happened to drop by over the next few weeks. I must confess, however, that I probably ate about half of them. I can't help it, I love a seriously good brownie.

Moosewood Brownies
adapted from Moosewood Cookbook


  • 5 ounces unsweetened chocolate (5 squares)
  • 2 sticks butter 
  • 1 3/4 cups packed light brown sugar
  • 5 eggs
  • 1 1/2 teaspoons vanilla
  • 3/4 c. flour
  • 1 cup semi-sweet chocolate chips (or anything else)

Directions:


  1. Butter a 9x13-inch baking pan. Preheat oven to 350 degrees F.
  2. Gently melt the chocolate. Let it cool for about 10 minutes.
  3. Cream the butter and sugar in a medium-sized bowl until light and fluffy.
  4. Add the eggs, one at a time, beating well after each.
  5. Stir in the vanilla.
  6. Stir constantly as you drizzle in the melted chocolate. After all the chocolate is in, beat well for a minute or two.
  7. Stir in flour.
  8. Mix just enough to blend thoroughly.
  9. Spread the batter into the prepared pan.
  10. Bake 20 to 25 minutes, or until a knife inserted into the center come out clean.
  11. Cut into squares while still hot, then allow to cool for at least 10 minutes, if you can wait that long.

Thursday, June 7, 2012

Vegan Strawberry Shortcakes


I've been obsessed with biscuits lately. Scones, shortcakes, flaky biscuits--anything that I can throw some fresh fruit and cream on. I found this great recipe for vegan shortcakes. While they are great right out of the oven--delicate crumb, balanced and light vanilla flavor--they did harden up as the day wore on. No bother, I simply split and toasted them. It should be noted too that while the shortcakes are entirely vegan, the whipped cream is not. These would be just as delicious with dairy-free vanilla ice cream.

Vegan Shortcakes

 3 cups strawberries, hulled and sliced
 ¼ cup and 2 T. white sugar, plus more for sprinkling
1 ½ cup all-purpose flour
2 ½ t. baking powder
¼ t. salt
6 T. dairy-free soy margarine, cut into pieces
½ cup unsweetened plain almond milk, soymilk or rice milk
 
Preparation:

1. Preheat the oven to 400 degrees. Line a large baking sheet with parchment and set aside. In a medium mixing bowl, toss the strawberries with the 2 T. sugar until well coated. Cover and place in the refrigerator for about 20-30 minutes.
2. Meanwhile, make the biscuits. In a big bowl, mix together the remaining ¼ cup sugar, flour, baking powder and salt until well-mixed. Add the dairy-free soy margarine and cut it in until the mixture resembles fine crumbs. Add the non-dairy milk alternative and mix until the dough just begins to hold together and pulls away from the sides of the bowl.
3. On a lightly floured surface, turn out the dough and pat into 8 small round biscuits. Transfer the biscuits to the prepared baking sheet, sprinkle lightly with sugar, and bake about 18-22 minutes, or until golden. Allow the biscuits to cool on the baking sheet. To serve, place two biscuits on each plate with a scoop of whipped cream or dairy-free ice cream and a helping of the sugared strawberries.

Tuesday, May 29, 2012

Pretty cake


Isn't this cake just the prettiest? I've never seen ruffles on a cake before. Great idea for a little girl's birthday cake, or a big girl's. Photo and directions at the paper pony.

Thursday, April 26, 2012

My sister's birthday gift


I made this video for my sister's birthday recently. I used Windows Live Movie Maker, which was really simple to learn and use.

It was inspired by this video that Wendy showed me, which is awesome embarrassingly accurate.


Thursday, April 12, 2012

Easter, lemon curd and general fattiness


This is what I've been doing around here lately--eating lemon curd and baking rich, sugar-laden food. It's what I love--to bake and eat sweet, rich things. Then I watched a 60 Minutes that included a report on sugar consumption and how it affects our bodies (including a new study that suggests that cancer cells flourish and feed on sugar in our bodies) and how we get sugar in nearly every processed food we eat.

I eat a lot of sugar. I unapologetically love to bake things like the cinnamon rolls above, which had no less than three cups of sugar in them.  Anyway, while I'm late to the party, eating less sugar is something I'm thinking about now. I'm inspired to bake more nutritious, less sweet treats, if only to ward off cancer. Maybe it's time to finally hone my bread-making skills. I'm afraid of yeast. That or it just doesn't like me. I swear I never used a yeast that was still 'alive;' in none of my experiences has the yeast actually foamed up like it was supposed to. I always just waited, and then after 20 minutes (despite the lack of foam) made the damn bread anyway. And nine times out of 10, my bread didn't rise.

Ok, now's my time to give it another go. Oh, btw, the lemon curd pictured above was perfection. I could eat anything if it were slathered in lemon curd.

Saturday, March 31, 2012

Snow day

We were lucky enough to make it to the snow in Lake Tahoe last weekend. The conditions were perfect, lots of snow on the ground but none on the road (no chains!)

Snowballs were thrown, one little snowman was made, and we even got to go tubing, which I insist is one of the most fun activities in the world. I swear Jack giggled all the way down the hill...each and every time.


And after it all, we got to come home to our sunny, warm little house. But I think someone would like to go back next year...


Sunday, March 11, 2012

Caramel squares

My Irish husband recently turned 30 and he's not really into birthday cakes. He prefers these decadent, chewy caramel squares. So, per his birthday request, I made these the other day.

They are seriously delicious. My sister describes them as homemade twix bars.

A rich shortbread crust is topped with chewy caramel and covered with a layer of chocolate. The caramel in mine ended up pretty chewy, like, hard to cut through. I'll attempt to make it softer next time, because it was so hard that the layers separated upon cutting, making them a pain to eat. And to get the full effect of these, you want all three layers at once.

I used regular, salted butter in my version and the flavors of both the shortbread and caramel were perfectly balanced on the sweet and salty spectrum. I soo need enough salt in my desserts--without it, I think sweets can really fall flat. 

Caramel Shortbread Squares
adapted from allrecipes

  Ingredients
  • 2/3 cup butter, softened
  • 1/4 cup white sugar
  • 1 1/4 cups all-purpose flour
  • 1/2 cup butter
  • 1/2 cup packed light brown sugar
  • 2 tablespoons light corn syrup
  • 1/2 cup sweetened condensed milk
  • 1 1/4 cups milk chocolate chips

Directions

  1. Preheat oven to 350 degrees F (175 C).
  2. In a medium bowl, mix together 2/3 cup butter, white sugar, and flour until evenly crumbly. Press into an 8-inch square baking pan. Bake for 20 minutes.
  3. In a 2 quart saucepan, combine 1/2 cup butter, brown sugar, corn syrup, and sweetened condensed milk. Bring to a boil. Continue to boil for 5 minutes. Remove from heat and beat vigorously with a wooden spoon for about 3 minutes. Pour over baked crust (warm or cool). Cool until it begins to firm.
  4. Melt chocolate using the double-boiler method. Pour chocolate over the caramel layer and spread evenly to cover completely.  Cut into small squares. 

Wednesday, February 29, 2012

I want to make this!


 Isn't this hand-sewn bird just the prettiest thing you've seen all day?
The pattern can be found in this book: