Showing posts with label recipes. Show all posts

Saturday, June 29, 2013

Plum jam


We made this plum jam the other day from plums we picked off various trees in our neighborhood park and growing on the side of the road. It's good, a bit tart, but I like tart. I burned the first batch, so I watched the second one carefully and cooked it less than the recipe called for. It's the perfect consistency; I love the chunks of purple and yellow plums.


We had some plums leftover, so I used them to make a plum cornmeal galette. It was perfection. I ate the whole thing by myself in just over two days. Not a good few days for the old health, but oh--who can resist? The taste of summer gets me every time.

Find the galette dough recipe here, and a link to the Martha plum jam recipe here. She uses plums and peaches, but I used all plums. I found I needed some extra sugar and maybe two pinches of salt to counteract the added sugar. It was still quite tart, but tasted homemade and not sugary sweet like store bought jam.

Wednesday, June 12, 2013

Random notes from parenthood oblivion


I love this idea over at A Beautiful Mess for updating a tired old wood table. All you need is lace and spray paint.

And this is ridiculous but also pretty funny. For crying out loud, eat your cereal, Ryan Gosling.

I'm obsessed with The Skunkboy Blog. Like, obsessed. Katie has inspired me to start wearing actual outfits again and and to care about how my hair looks. Thank you for bringing me back from new motheritis. Now I only wear sweats at home.

And speaking of hairdos, here is a list of 20 great hair tutorials for long-haired gals like myself. I'm having fun with my hair again! Sorry for the enthusiasm, but I feel like I'm waking up from a long nap...

I made this lemon pie with a saltine crust that everyone on NPR raved about. My sister and her boyfriend loved it, but not me so much. Maybe a chocolate filling to go with the salty crust? Not lemon, anyway.

Finally, here is a really cute handmade baby toy that I think would be perfect for my little one.


Saturday, May 18, 2013

Salt clay creatures

On a rainy day, Jack and I crafted some of these salt clay creatures. He just loves them. You make the clay and bake it in the oven until totally dry, then cover with paint. We did these a few weeks ago and they are holding up very well, minus one little snake that broke in half. The recipe for the salt clay is below, we used acrylic paint on them (nontoxic, of course.)


Salt Clay:
3/4 cup salt
2 cups flour
3/4 cup water

To make: Mix the dry ingredients together. Then add the water gradually. When the dough forms a ball, knead it well, adding more water if it's too crumbly. Shape it into snakes, roll it out and cut it with cookie cutters, the sky's the limit here. Just make sure no pieces are too thick, as they may not dry thoroughly in the oven. Bake them on a cookie sheet (ungreased) in a 300 degree oven for 30-40 minutes or until they are dry and the bottoms get a little brown. Wait for them to cool, then paint!


Saturday, March 16, 2013

Poached eggs, where have you been all my life?


I'm addicted to poached eggs, ever since I learned how to make them a few weeks ago. If you don't know how to do it, and you love your eggs poached (like I do) here's a very simple, helpful tutorial from Smitten Kitchen.

The yummy, healthy dinner (or breakfast) from these pictures comes together in the time it takes to poach your eggs, which is about four minutes once your water has boiled. I always include some lightly dressed greens, sandwiched between a buttered English muffin and a not-quite-four-minute poached egg.


And the acorn squash is something I just discovered this year. It's sweet and pumpkiny, the skin gets caramelized and chewy in the oven--hello edible skin! In that way, it's better than butternut squash. It roasts up easily, tossed with oil and rock salt in a 400-degree oven for a mere 20 minutes. 

Saturday, February 23, 2013

Hakka noodles, cookies and a baby


I'm kind of obsessed with Hakka noodles since reading this article in the February issue of Sunset magazine.

It's basically four recipes that you can mix and match: Chinese sesame noodles, chicken and ginger broth, soy-glazed vegetables and pork. I made mine vegetarian, with tofu. The sesame noodles are addictive on their own (I eat them cold out of the fridge) and also good in the ginger broth. And it's great to have lightly sauteed vegetables in the fridge, an easy way to get more veggies into my diet. My four-year-old likes the different combinations and is a tofu monster, so I'm happy he's eating good food.

And on an entirely different and crazy unhealthy note: I finally made the cookies whose recipe I've been making sexy eyes at for months now. Brown butter, nutella-stuffed, sea salt studded chocolate chip cookies. The name is an entire sentence, amazing.


And they are good. And huge. Are they really supposed to be this big? The recipe says it makes 24, I made 28 pretty huge cookies. I put a lot of sea salt on each, they can take it with all the chocolate in them. And nutella. And brown butter. Ugh, my diet starts tomorrow. This picture is pretty bad, but for great photos and the recipe, go here.

And finally, here is what I've been working on these last 11 months. Baby Adam is here and I'm feeling like myself again. I loved being pregnant, but it feels good to be able to lift heavy things and get some serious exercise, you know what I mean?


Wednesday, February 6, 2013

Bits and bobs

My wee new son is now six weeks old and the craziness that goes along with bringing a baby into the world is starting to calm down; I am trying to take it all in and treasure/survive these early days. Life at home with a four-year-old and a five-week-old (both boys, no less) is loud. It's loud and active and frankly, totally exhausting. But there's just something so wonderful about it all too...

In other news...

I love this hairstyle, so elegant yet breezy.

This is what I want for Valentine's Day, the most gorgeous color ever.

Since having my last C-Section, I've been looking at comfortable and cute underwear that doesn't rub along my sore tummy. These pairs look cute AND comfortable. Wish I'd have thought to buy them before I went into the hospital. I even sewed a pair of my own granny panties, pattern here. I used synthetic jersey, which wasn't as soft as I'd have liked. I'd love them in something really luxurious, like organic bamboo.

I'd like to have this for dinner tonight and these for dessert, just saying.

I'm working through these TED talks at the moment.

And I love these dishes but really, Anthropologie, three-hundred dollars for a cake stand that won't even stand up?

And this is the funniest thing I've read in a long, long time.

Wednesday, January 30, 2013

50 Awesome tips for an easier life

I saw this awesome post, the image above is from it. It's kind of an updated Martha Stewart's Good Things for the rest of us. Another idea is below. Bah! Love stuff like this!


Thursday, January 24, 2013

Isn't this the sweetest little Christmas tree angel? I found this little gem at the Goodwill years ago, at the bottom of a bin. She is made out of paper and is about as tall as my pinkie finger. She's my favorite ornament, and each year when I unwrap her she makes me smile.

It's been a long, wonderful, busy few months. I had a baby who is a month old today. I now spend most of my time taking care of him and his older brother, feeding, changing diapers, cuddling, reading books, cleaning, doing unreal amounts of laundry. I'm still recovering from a C-section, those things are no joke. Today was actually the first day I could manage the laundry on my own. Am anxious to feel strong and able-bodied again. Patience...


 We made 'gingermen' over the Christmas break. Jack was thrilled and loved decorating them. I found the recipe online over here.

And finally, here is, thus far, my favorite drawing of Jack's. Pretty amazing I think.

Sunday, December 2, 2012

Cake pops

We made these for our little man's preschool buddies last week. It was my first attempt at making cake pops and they came out great. I would recommend watching this short and helpful tutorial before making your own, because it seems like there are some things that could go wrong and you really want these to turn out right, because when they are right, they are so right, it's scary. The cake inside is moist and decadent (because it's mixed with frosting) and it combines so well with the semi-hard chocolate outside...it's just awesome.

I used a boxed spice cake mix, homemade cream cheese frosting and two bags of white chocolate chips. These buggers use up a lot of chocolate coating, more than I thought. The first step is to crumble the cake up into tiny pieces. You'll need a huge bowl or you'll just have to do it in two batches, like I did.


The next step is to add frosting, but as the tutorial and many recipes warn, do not add too much or you will get gooey, overly sweet cake. I used a big spoonful, maybe about two or three tablespoons, for half of a 9 x 13-inch cake. You want to be able to roll the cake into balls, but you don't want them sticky.


Next, you dip one end of your skewers or lollipop sticks into a little bit of the chocolate that you are going to use to coat them later and press these halfway into the balls. This step is meant to ensure that the balls won't fall off the sticks.

The cake balls can be as big as you want them, I made mine kinda large and they were a little hard to eat off the stick, that is, the weight kinda pulled them off after the first bite. Plus, they are pretty rich, so keep this in mind when you are rolling them. One box of cake made about 2 dozen cake pops.

After the sticks are in, throw the cake pops in the freezer for at least 20 minutes. I left mine in for a few days (after transferring them to freezer bags for freshness.)

When you're ready to dip and decorate, first make sure you have something that you can use to prop up your pops while the chocolate hardens. Styrofoam or floral foam works well, but I didn't have either of these lying around, so I poked some holes in a cardboard box lid and voila--it worked perfectly.

Next, you just melt your chocolate and dip those little suckers in there. Let the excess chocolate drip off so it doesn't run down the stick when you turn it right side up. Sprinkle with little candies, or don't, they look great either way. Let the chocolate harden (which doesn't take long since the pops are frozen.) Let them sit for a bit so the cake cools to room temperature and then enjoy. I kept them at room temp for a few days and they were awesome!

Sunday, October 21, 2012

What may be the best cookies ever?

Holy crap. I just saw this recipe and had to post a link to it, if only so I don't forget that these exist.


Who wants some Nutella-stuffed Brown Butter and Sea Salt Chocolate Chip Cookies? Recipe here

Saturday, October 6, 2012

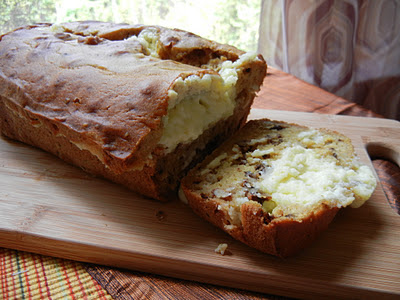
Pumpkin bread with cream cheese filling and homemade vanilla extract


Seriously, this looks so good I think I'm going to make it for dinner tonight.  Find the recipe here

I also made some homemade vanilla extract a few weeks back. I found the recipe in this awesome book that I got for Christmas last year.


The homemade vanilla is relatively simple to make, and pretty inexpensive when you consider how much a tiny jar of extract costs. This recipe makes a ton (about two cups worth) and uses just five vanilla beans (about $3 at Whole Foods) and two cups of vodka (the cost depends on the quality of vodka you use, I had Smirnoff on hand.)

To make it, you just gather a mason jar (mine held 16 oz. filled up to the very top,) some vanilla beans (5) and rum or vodka. Open and scrape the vanilla pods, stuff the seeds and the pods into the jar and fill it up with your alcohol.


Then let it sit for a few months before using, shaking every week or so. Mine should be ready around Thanksgiving, before I begin all my holiday baking. And I seriously go through a lot of vanilla, more so than liquor (especially now that I'm pregnant!) The flavor of the homemade variety is supposed to be much better. This is what mine looked like after I made it, but it's already much darker now after just a few weeks.


Sunday, September 30, 2012

Pear bread and Liberace pumpkins, ahh...Fall is here

We have a lovely pear tree in our front yard that dumps pears every year from August to October. We let the deer eat lots of them, we share them with friends and eat plenty on our own, but I wanted to find a good recipe for baking with them. I made pear pie last year, which was yummy, and have tried out different crumble recipes, but this pear bread was really tasty. It's similar to zucchini bread, but with a somewhat more grainy, pear-like texture. Very moist and flavorful, great for breakfast and afternoon tea.
Recipe here.

In other news, aren't these the cutest/most gaudy Halloween decorations? I'm making one...or five. Directions here.


Wednesday, June 13, 2012

Moosewood Brownies


I think I've found my brownie recipe. I baked off a tray of these decadent, fudgy brownies for a pool party recently. The pool party ended up getting canceled...and guess what happened to all the brownies?

No, I didn't eat all of them. I froze half (they freeze beautifully--are even more moist once thawed) and shared them with lucky friends who happened to drop by over the next few weeks. I must confess, however, that I probably ate about half of them. I can't help it, I love a seriously good brownie.

Moosewood Brownies
adapted from Moosewood Cookbook


  • 5 ounces unsweetened chocolate (5 squares)
  • 2 sticks butter 
  • 1 3/4 cups packed light brown sugar
  • 5 eggs
  • 1 1/2 teaspoons vanilla
  • 3/4 c. flour
  • 1 cup semi-sweet chocolate chips (or anything else)

Directions:


  1. Butter a 9x13-inch baking pan. Preheat oven to 350 degrees F.
  2. Gently melt the chocolate. Let it cool for about 10 minutes.
  3. Cream the butter and sugar in a medium-sized bowl until light and fluffy.
  4. Add the eggs, one at a time, beating well after each.
  5. Stir in the vanilla.
  6. Stir constantly as you drizzle in the melted chocolate. After all the chocolate is in, beat well for a minute or two.
  7. Stir in flour.
  8. Mix just enough to blend thoroughly.
  9. Spread the batter into the prepared pan.
  10. Bake 20 to 25 minutes, or until a knife inserted into the center come out clean.
  11. Cut into squares while still hot, then allow to cool for at least 10 minutes, if you can wait that long.

Thursday, June 7, 2012

Vegan Strawberry Shortcakes


I've been obsessed with biscuits lately. Scones, shortcakes, flaky biscuits--anything that I can throw some fresh fruit and cream on. I found this great recipe for vegan shortcakes. While they are great right out of the oven--delicate crumb, balanced and light vanilla flavor--they did harden up as the day wore on. No bother, I simply split and toasted them. It should be noted too that while the shortcakes are entirely vegan, the whipped cream is not. These would be just as delicious with dairy-free vanilla ice cream.

Vegan Shortcakes

 3 cups strawberries, hulled and sliced
 ¼ cup and 2 T. white sugar, plus more for sprinkling
1 ½ cup all-purpose flour
2 ½ t. baking powder
¼ t. salt
6 T. dairy-free soy margarine, cut into pieces
½ cup unsweetened plain almond milk, soymilk or rice milk
 
Preparation:

1. Preheat the oven to 400 degrees. Line a large baking sheet with parchment and set aside. In a medium mixing bowl, toss the strawberries with the 2 T. sugar until well coated. Cover and place in the refrigerator for about 20-30 minutes.
2. Meanwhile, make the biscuits. In a big bowl, mix together the remaining ¼ cup sugar, flour, baking powder and salt until well-mixed. Add the dairy-free soy margarine and cut it in until the mixture resembles fine crumbs. Add the non-dairy milk alternative and mix until the dough just begins to hold together and pulls away from the sides of the bowl.
3. On a lightly floured surface, turn out the dough and pat into 8 small round biscuits. Transfer the biscuits to the prepared baking sheet, sprinkle lightly with sugar, and bake about 18-22 minutes, or until golden. Allow the biscuits to cool on the baking sheet. To serve, place two biscuits on each plate with a scoop of whipped cream or dairy-free ice cream and a helping of the sugared strawberries.

Sunday, March 11, 2012

Caramel squares

My Irish husband recently turned 30 and he's not really into birthday cakes. He prefers these decadent, chewy caramel squares. So, per his birthday request, I made these the other day.

They are seriously delicious. My sister describes them as homemade twix bars.

A rich shortbread crust is topped with chewy caramel and covered with a layer of chocolate. The caramel in mine ended up pretty chewy, like, hard to cut through. I'll attempt to make it softer next time, because it was so hard that the layers separated upon cutting, making them a pain to eat. And to get the full effect of these, you want all three layers at once.

I used regular, salted butter in my version and the flavors of both the shortbread and caramel were perfectly balanced on the sweet and salty spectrum. I soo need enough salt in my desserts--without it, I think sweets can really fall flat. 

Caramel Shortbread Squares
adapted from allrecipes

  Ingredients
  • 2/3 cup butter, softened
  • 1/4 cup white sugar
  • 1 1/4 cups all-purpose flour
  • 1/2 cup butter
  • 1/2 cup packed light brown sugar
  • 2 tablespoons light corn syrup
  • 1/2 cup sweetened condensed milk
  • 1 1/4 cups milk chocolate chips

Directions

  1. Preheat oven to 350 degrees F (175 C).
  2. In a medium bowl, mix together 2/3 cup butter, white sugar, and flour until evenly crumbly. Press into an 8-inch square baking pan. Bake for 20 minutes.
  3. In a 2 quart saucepan, combine 1/2 cup butter, brown sugar, corn syrup, and sweetened condensed milk. Bring to a boil. Continue to boil for 5 minutes. Remove from heat and beat vigorously with a wooden spoon for about 3 minutes. Pour over baked crust (warm or cool). Cool until it begins to firm.
  4. Melt chocolate using the double-boiler method. Pour chocolate over the caramel layer and spread evenly to cover completely.  Cut into small squares. 

Sunday, February 12, 2012

Valentine sandwich cookies and a sweet purse

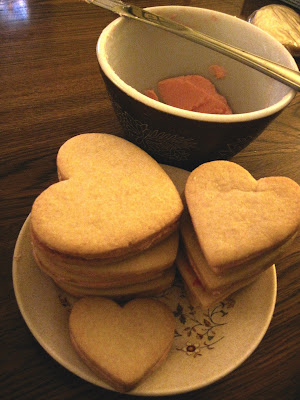
We made up a quick batch of sugar cookies last night, using Martha's sugar cookie recipe, which follows here. I eyeballed a quick frosting and tinted it pink for Valentine's Day. We, oh who are we kidding, I then wrapped them up and personalized them with some little stamps. Jack will be bringing some to friends at his preschool.


 Valentine Sandwich Cookies
  • 4 cups sifted all-purpose flour
  • 1/2 teaspoon salt
  • 1 teaspoon baking powder
  • 1 cup (2 sticks) unsalted butter
  • 2 cups sugar
  • 2 large eggs
  • 2 teaspoons pure vanilla extract, or 2 teaspoons fresh lemon juice and zest of 2 lemons
  • 1/4 cup fine sanding sugar, for decorating (optional)
  1. In a large bowl, sift together flour, salt, and baking powder. Set aside.
  2. Use an electric mixer to cream butter and sugar until fluffy. Beat in eggs.
  3. Add flour mixture, and mix on low speed until thoroughly combined. Stir in vanilla or lemon juice and zest. Wrap dough in plastic; chill for about 30 minutes.
  4. Preheat oven to 325 degrees. On a floured surface, roll dough to 1/8 inch thick. Cut into desired shapes. Transfer to ungreased baking sheets; refrigerate until firm, 15 minutes. Remove from refrigerator, and decorate with sanding sugar, if desired. Bake until edges just start to brown, 8 to 10 minutes. Cool on wire racks.      Yield Makes about 16 large cookies or 30 2 1/2-inch cookies

In other news, I recently realized that the makeup bag in my purse is waay too big and takes up too much space in my bag. Rather than go out and buy one, I figured I'd make a quick pattern and whip one up. From start to finish, this little purse took all of two hours to sew--and the ribbon is sewn on my hand. I love quick, rewarding little projects.


Here's what I did:
First, I cut out long rectangular pieces from two fabrics. I used my quilting ruler to help make sure they were square, especially the point at the one end for the closing flap.


Then I sewed the layers together, right sides together, leaving the short, straight end open. I snipped the corners, then turned it out carefully.
Then I turned the open end in neatly and sewed that closed, sewing all around the perimeter of the piece, with about a quarter inch seam.
Then I folded it in threes, with the lining fabric on the inside. Mine is tan muslin. I also place the ribbon down, wrapping the ends in at one side.

 Then I ran it through my sewing machine and used short, strong stitches up the two sides.
Next, I pinned the ribbon around the base where I wanted it. (The ends were already sewn in when I stitched up the sides.) Then I hand sewed it on with dark blue thread.

And voila! Done.